Monday 27 May 2013

The Christie Antique Show

This past weekend a friend and I went to The Christie Antique Show near Hamilton, On.  It was my first time attending the show and I wasn't disappointed!  If money were no object and I had that mansion that I've been dreaming of, soooo many things would have been coming home with me.

Not knowing exactly what to expect, I went with some cash in my pocket and a list of a few things to keep an eye out for.  I was looking for a night table for the little man's room, a chandelier for Audrey's room, a side table for the living room, endless things on my list of decorative items, and anything else that caught my eye.  While I didn't find anything on my list, this beauty came home with me.


We came across a stall with loads of wooden boxes and I was instantly hit with inspiration and thought toy box for the little man's room.  So, I started searching through the pile and couldn't find anything big enough when this caught my eye from under a table, just as I was about to walk away. 

It needs a tiny bit of love to make it safe for little kid use - it has some small nails that need to be hammered back in, the inside is a little rough, and some edges need a very light sanding.  So, J will be getting to work fixing the outside but I had an idea for the inside.  And it involved sewing.  Cue dramatic music.

See, I never really learned to sew.  I only took it up in my early 20's as a maybe once-a-year project after trying to sew a Ginger Spice UK flag dress for Halloween.  Yea, I did.  And please, try not to laugh....
 
 
A couple months ago I got into a fight with my antique of a sewing machine (antique - not in a good way, more like a curmudgeon) and was lucky to receive a new one for Mother's Day.  I was on the hunt for some projects.  I impulse bought this fabric back around Christmas from Tonic Living, intending to sew some pillow covers but never got around to it, so I decided to repurpose the fabric.  What I came up with was this.....


I am sooooo happy with how it turned out!  I spent Sunday sewing this up and was so excited and proud of myself I had to take these pictures right away.  The colour looks a little orange in the photos but is actually a very true red.  I am now making a lining to add to this because you can see a little of the back of the fabric peeking out at the bottom, but I'll consider this a success!

Thursday 23 May 2013

Bulking Up

We decided to really, I mean REALLY, beef up our millwork here. 

Our starting point was some trim that was likely installed in the 1970's, along with the windows.  It was once the cheapest cuts of wood, some not fit to be seen outside of walls, that was once an oak colour and was poorly painted white.  Well, not all the way, you could still see some original colour peeking through.

Lucky us, everything on the main floor needed to be ripped out during the flooring and window installation - a blank canvas.  The master bedroom and one of the other rooms still have the original trim so we did our best to match it and did, we loved the simple and classic look. 

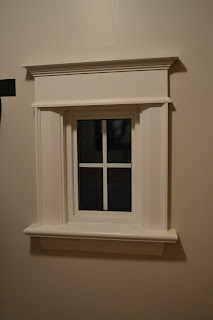
After shopping around the Toronto area, we found the best pricing and customer service at Classic Wood Mouldings.  We went with - an 8" baseboard with a very simple sloping shape.  The door frames are 4" and match the base boards, with an additional casing with back band.  What we did additionally was added a header, which I'll explain below.  For the window frames, we did the same but added a substantial sill with an additional piece below.

Here's a view of the baseboards.  When we put our order in we included a piece of quarter round but have been going back and forth over installing it or not.  Right now it is very simple but the quarter round would help to fill where there is a teeny bit of space, where the 8" piece doesn't quite hit the flooring.  J mentioned the other day it might be going in sooner rather than later, but we'll see!


J custom built each header after the frames were installed.  To do this, he used a plain piece of 1"x5" plate.  On the bottom is a casing with back band and to top it all off is crown moulding.  Here's a (darkish - sorry!) look.


Here's a look back at what the trim looked like before we took possession.


And you'll notice in the next two photos (used in my last post too) that we chose not to reinstall the French doors between the dining and living room and the hall and stairs to the basement.  When they came down, we were so pleased to find that it wasn't original to the house.  Instead, they were actually finished with plaster and in good shape.  We had to do a little beautifying but things flow much nicer now.


We have big plans for upstairs that include refinishing the stairs, restaining the hardwood flooring and a complete washroom gut.  It made holding off on replacing the trim upstairs an easy decision and know that will come in time. 

Tuesday 21 May 2013

New Flooring


There are so many choices when it comes to hardwood flooring.  The first, for us, was an easy one - solid hardwood over engineered and chose white oak.  We made an early decision to keep fixtures true to the age and period of the home.  We are doing our best to restore the original architectural details to the house after so many were lost, so solid hardwood flooring was a must.
 
Here's the before.  The flooring really wasn't that bad, but ended up replacing the entire main floor flooring, which you can read about here


You can always learn a thing or two from friends, right?  While we had a friend install beautiful hardwood flooring in their home, it was very time consuming.  Given our tighter timeline (Audrey and I were at my mom's house waiting to move in and J was heading back to a new job), we had it professionally installed.  We chose to go with Darmaga Flooring not only because of their excellent online reviews, but on the recommendation of three people who have used their services, including my parents!  Their hardwood floors were installed over 10 years ago and still look stunning.  The devil is in the details and the nosing and transitions look fantastic. 

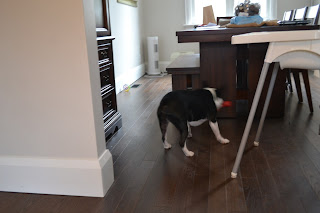
 When choosing a hardwood floor, I recommend you think about the use it's going to get and your family.  From my research, there are three main finishes you can go with - lacquered, wire brushed, and hand scraped.  These vary from a shiny finish to an almost raw, rough looking finish.  We have a young family, a dog, and two cats so a lacquered finish wasn't for us.  The hand scraped as a little too rustic looking wasn't for us, we wanted something a bit more traditional to go with the age and style of our home.  So wire brushed it is!
 
Here's a view from the same spot in the family room, first looking into the hallway and second, into the dining room.

 
The only area on the main floor that isn't hardwood is the small area at the front door.  Our side and back entryways are a little tight so I knew we'd be coming in and out of this door with groceries, babies, and anything else that is big and heavy.  Add wet and dirty shoes and you have the killer of hardwood floor.  Enter ceramic tile.  It was best for us, given that it will stand up to the test of time better than other tile options.
 
I have a thing for subway tiles but traditional subway tiles were too small for the area.  I went with an oversized tile measuring 12"x24" is a very soft taupe.
 
 
Our new flooring is beautiful!  We are so pleased with how everything looks, especially the touches that we knew we couldn't do on our own, like the transitions.  We still need to get to work on the staircase.  Stripping and sanding it down to paint and stain it, but things were starting to come together.

Monday 13 May 2013

Improving Our Value, R-Value

Did you know the idea of insulation is relatively modern?  So modern that our late 1920's house had little to none.  Wanting to keep the baby, dog, and cats warm, we started looking into options before we even moved in.

It was best for us to work on the exterior first, repointing the bricks.  We knew this was a must, they needed some serious loving.  We weighed the option of J completing the work himself but after looking at the scope of the work and the tools required, we went with a contractor.  Here's the before and after:

The Before:

 
And After:


Much better, right?!  Mortar has a shelf life of about 80-100 years and our was nearing it's end.  Not every joint needed repairing, about two-thirds total, but we found it was primarily under windows and the roof.  By repairing the pointing, we are protecting the house from water getting in and damaging the brick and sealing the house from drafts. 

Our contractor did such a great job matching the new mortar with the existing, which I'm sure was hard considering it had small pebbles and sea shells mixed in.  Here's a close up of the repairs.


If you take another look at the before and after above, you'll see we also replaced all of our windows and doors.  Again, this was an absolute must.  The previous windows were installed in the 1970's and were not making the grade.  I noticed that our old windows, like so many others in the area, only open in the bottom third of the window and the top two thirds is a single pane.  This meant that of the total window area, only 1/6th was open to let the breeze in. 

Our new windows are double hung and offer us security, beauty, and a fantastic breeze coming in on hot days.  Double hung is slightly (very slightly) less energy efficient than single hung or casement windows but was the right choice for our family.  I like that I am able to open the top of the window and there is even less of a risk of our little monkey pushing on the screen and falling out.  Additionally, we replaced the old wooden entry doors with new steel security doors, for the same reasons above. 

Audrey's favorite spot to watch for Daddy to come home - and no risk of ending up on the front porch

Having completed what we could on the exterior of the house, it was time to think about the interior.  We contacted insulation specialists to talk about our options and identify where we could make improvements.  Just like our old house, this one doesn't have any insulation in the walls.  We also knew that our attic was insulated with little more than stacks of newspaper. 

Reinsulating the walls is a very invasive improvement.  It involves punching holes in between each stud, typically 16 inches apart.  We were advised against this option because the space between the lathe and plaster and the brick is so small, that very little insulation would be blown in meaning a whole lot of work and money for very little pay off.  Additionally, the specialist had a handy tool that let us know there was very little heat exchange, meaning they were best left as is.  Next please! 

The attic was our best bet.  This was our opportunity to really beef up the R-value of our home and to take on the project to save some bucks.  After some careful research, J and a very helpful friend headed to Lowes to rent a machine to blow the insulation into the attic.  This is a two person job, one to feed the machine and a second to direct the insulation.  With the machine on the front porch and a tube running through our bedroom window to the attic, they got to work.  If you have any questions about the process, ask away in the comments section, I'll make sure J answers them for you.

We chose cellulose insulation over fibreglass due to the itch factor and because we weren't professionals doing this, we didn't know how much would end up outside the attic.  And thankfully we did!  At one point, the hose came loose and there was insulation being blown into our front yard for a couple seconds.  I would have been worried about an environmental disaster and little people playing in the grass had it been fibreglass insulation.

Our last option to make our home as energy efficient as possible is to fully insulate the basement.  The specialist advised us to really look at our options when the time comes to refinish the basement, including.  For now, we are living with the basement in it's current state but are looking forward to the next year or two when that project will take priority.  Once that is complete, we know we'll have the best insulation possible for our home.

Saturday 11 May 2013

First Things First

Here's how rewiring our house turned into a complete overhaul of our main floor.

One of the first things we knew we had to do when we took possession of our house was to upgrade our wiring.  A totally unglamorous job - but a matter of safety, peace of mind, and needed for insurance coverage.  What wasn't knob and tube was aluminum wiring so we knew we were going to be sinking quite a bit of money into this project.  That being said, we did our research and hired a very reputable company we found through Homestars.com and referrals from friends. 

Friends, make no mistake, this was a messy, dirty, invasive job!  J made an early promise that we would not be undertaking any renovations so when faced with the prospect of ripping up either the basement ceiling or the kitchen and hallway subfloor, we decided to go with the basement.  With a teeny infant baby, it made the most sense to be able to close the door and ignore the mess.  All that changed with a phone call letting me know our new appliances would not fit, setting off a spending and reno spree. 

The previous owner had actually built the kitchen around appliances - like, placed the stove then wedged it with a lower cabinet.  Then, installed the dishwasher and locked it into place with the counter.  Seriously.  It meant we would need to scratch and dent our brand new sparkling appliances to make due with a temporary kitchen.  So - having just installed a kitchen 4 months prior, we were ready to tackle another.  It also meant that we got to rip up the lovely harvest gold tile running from the front door to the back.


We knew we wanted to install the same kitchen as we had before, from IKEA.  Once we got the layout finalized, it was time to choose flooring.  When J mentioned this, I had to break it to him that I had my heart set on hardwood flooring throughout the main floor.  The look I received was somewhere along the line of "after jackhammering, hauling, and disposing of 2500 lbs of tile you want me to now rip up two rooms worth of decent existing hardwood floor." To which I replied yes...

Soon our house looked like this:
 
 
The holes in the wall were everywhere.  The electricians did their best to create holes where the baseboards would eventually cover, but often wasn't possible.  The saving grace was that our basement was spared. 
 
Once the wiring was complete and hardwood floors installed, J got busy installing the basics in the kitchen.  We still haven't completed the finishing, but that will come in time.  Hopefully soon?
 
Just over two weeks after starting the renovations, Audrey and I were ready to move back in.  Here's what we were greeted with.


Once I take you through all of our projects we started when we moved in, I promise to take you through what we have done over the past year to finish projects and the new ones we've taken on.


Monday 6 May 2013

One Year In Our Home

The other day, my husband and I were in our kitchen and I mentioned to him that our one year anniversary of being in our new house was approaching.  I was feeling sentimental and wondering how we should mark the occasion when he let me know that it had already passed, two days before.  Oops!  Time has really flown by. 

We moved in early May 2012, when Audrey was just three weeks old.  Crazy, I know.  In case you're wondering, moving with a teeny tiny infant is not ideal.  J and I had a hard time packing things up before the baby came because we weren't sure what we were going to need.  Coupled by the fact that I had an emergency C-section and couldn't lift anything, it was a stressful time for us.  Oh, and when your husband tells you the basement is "95% packed up and there is nothing to worry about, honey," don't believe him.

So, let's take a look at what our house looked like just a month before we got the keys. 

 
 So, why did we move?  We were the proud owners of your standard Toronto two bedroom bungalow that we had almost finished renovating from top to bottom, inside and out.  We knew our days were numbered in that house and were looking for new, bigger challenges.

Back in the summer of 2011, I lost my job and found myself driving J to the subway each morning for two reasons.  One, to make life easier for him and two, to make sure I got a good start to my day of job searching.  On our way, we would pass this house and discovered a small sign on the front law that said for sale by owner with a website for more information.  I honestly don't think these people cared about selling their house - there wasn't even a phone number and they took their sweet time answering our initial email. 

We toured the house with the owner's daughter, who knew little about the house, and left feeling underwhelmed.  With news that two would become three, we stepped up our house hunting in the fall and winter.  It was only when we started seriously looking around and touring open houses did we realize that this was the home for us.  So early 2012 we reconnected with the owners, who were now renting the house, and started negotiations.  We would have liked to move sooner, but the tenants needed two months notice.

I think of the few people who looked at the house, most were scared away....and here's why via a photo tour.
 Front door
 Living room
 Living room, looking into dining room
 Dining room and a very pregnant me
 Stairs
 Upstairs washroom
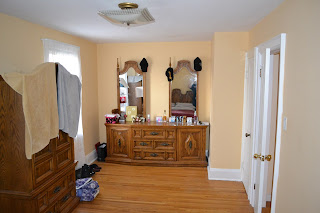
 Master bedroom
 Master bedroom, other side of room
 Basement kitchen with door leading to cantina
 Basement hallway
 Basement washroom
 Basement back hallway
 Kitchen, looking towards the front door
Kitchen, looking towards mudroom and back stairwell
 
So there you have it.  I will follow up with some posts on what we needed to do immediately, our progress, and what projects we have tackled since.  Let's just say, when Audrey and I finally moved in three weeks later, we were washing baby bottles in the sink in the upstairs washroom, spending our days in her nursery, and eating out of a mini-fridge in her room.  

Wednesday 1 May 2013

Hosting a Very Special Birthday Party

My little lady, Audrey, turned one on April 11th.  We are so lucky to have so many family members who have been so supportive over the past year that we wanted to invite everyone...all 60 immediate family members!  Our house can't accommodate everyone at once so we decided to break things up and hosted three separate parties.  Crazy, I know.


Here's how we did it.  Her birthday was a Thursday so the weekend before we hosted a Sunday dinner for my mom's side of the family, who all live close to or in the city.  The following weekend we hosted two later lunches for J's family and my dad's side of the family.  I weighed the pros and cons of the stress of hosting three parties with renting a hall or restaurant and I think if we had gone the 'one big party' way, then people wouldn't have had a chance to really see the birthday girl - and that's who they all came to see!  Twenty people per party was still a little tight in our home but we found a way to make it work.

To set the mood, I made all of her decorations, with the help of my sister.  A party wouldn't be a party without bunting!  Here's a picture of our little family.


And cake!


And more cake!  Actually, she really didn't enjoy her cupcake smash.  And I think I was the only one upset by it.  She loved squishing the icing between her fingers and had a couple licks but literally shuddered when she took a bite of cake and started to get upset.  I'm going to blame that on the fact it was so close to bed time and she didn't have the best nap. 


She was completely into unwrapping her presents!  We discovered at Christmas that she loves unwrapping gifts and is just excited about the wrapping, tissue, and boxes as she is about what's inside.  She loves finding clothes inside the box just as much as toys.  She was so lucky to receive enough toys to keep her entertained through to next year and outfitted for the summer, a huge thank you to everyone.


I was really ambitious and also decided to make all of the food for the parties, with the help of my sister, again.  I tried to keep things simple and make and prep as much as possible before hand so I could enjoy time with our guests.  Most of all, I tried to stay relaxed and go with the flow - no one wants a stressed out host! 

I am so happy she did so well with so many people over the three days and with us singing happy birthday to her.  A final wave goodbye to all of our guests and she was ready for a nice long bath and to be tucked in for the night.